Indoor photography lighting is the single most decisive factor that separates forgettable snapshots from stunning, professional-quality images. Whether you are shooting portraits in a living room, capturing product photos for an e-commerce store, or creating content for social media, mastering how light behaves inside enclosed spaces will fundamentally transform your results. Unlike outdoor photography, where the sun provides a massive, free, and remarkably powerful light source, indoor environments challenge photographers to shape, redirect, and amplify whatever light is available. This guide dives deep into the principles, tools, techniques, and common pitfalls of indoor lighting setups so you can elevate your craft at any skill level.
Why Indoor Photography Lighting Matters So Much
Light is the raw material of photography. Without it, there is no image. Indoors, the available light is typically dimmer, directional, and mixed — combining warm tungsten bulbs with cool fluorescent tubes or daylight streaming through windows. This complexity is what makes indoor lighting both challenging and incredibly rewarding once you understand it. Home studio lighting, portrait lighting indoors, and product photography lighting all depend on the same foundational principles: direction, intensity, quality, and color temperature. When you control these four variables, you gain creative power that no post-processing trick can fully replicate.
The Four Pillars of Indoor Light
Every lighting setup you build indoors rests on four core characteristics:
- Direction — Where the light originates relative to your subject. Front light flattens texture, side light adds drama and depth, and backlight creates silhouettes or glowing edges.
- Intensity — How bright or dim the light is. You can control intensity by moving lights closer or farther, adjusting power output, or using diffusion materials.
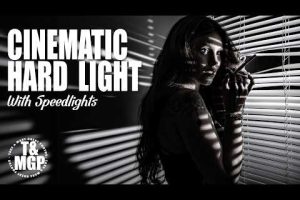
- Quality — Whether light is hard (sharp shadows, high contrast) or soft (gradual shadows, gentle transitions). Soft light is generally more flattering for portraits; hard light works well for dramatic or editorial looks.
- Color Temperature — Measured in Kelvin, this determines whether light appears warm (amber), cool (blue), or neutral. Mixing incompatible color temperatures inside a single frame creates ugly color casts.
Types of Indoor Lighting Setups for Photographers
Not all indoor shooting scenarios are the same, and neither should your approach be. The best photographers adapt their lighting strategy based on the environment, subject, and intended mood.

Natural Light Photography Indoors
Window light is one of the most beautiful and accessible tools available. A single window can act as a large softbox, wrapping your subject in gentle, directional illumination. Here are practical tips for maximizing natural light indoors:
- Shoot facing the window for soft, even illumination on your subject’s face.
- Use sheer curtains or white bedsheets to diffuse harsh midday sunlight streaming in.
- Position reflective boards (white foam core or collapsible reflectors) on the shadow side to bounce light back and fill dark areas.
- Avoid mixing window light with overhead fluorescent fixtures, as they often produce conflicting color temperatures.
- Shoot during golden hour when warm, low-angle sunlight enters the room and creates rich, cinematic tones.
Artificial Light Sources for Indoor Work
When natural light is insufficient or unavailable, artificial lighting becomes essential. The most common setups include strobes, continuous LED panels, speedlights (hot shoe flashes), and softboxes or umbrellas. Each has distinct advantages depending on your shooting style.
Strobes and monolights deliver powerful, short bursts of light ideal for freezing motion and achieving sharp results in dark environments. Continuous LED panels allow you to see the lighting effect in real time, making them excellent for beginners learning indoor lighting setups and for video work. Speedlights are compact, portable flash units that can be bounced off ceilings or walls to create softer, more natural-looking illumination.

Mixed Lighting Environments
Many indoor spaces combine multiple light sources — a window on one side, overhead recessed lights in the ceiling, and maybe a desk lamp in the corner. Managing mixed lighting requires either choosing which source to prioritize and suppressing the others, or correcting color casts in post-production. For the most control, light gel filters can be placed over continuous lights or flashes to match the color temperature of your dominant ambient source.
Essential Lighting Modifiers and Their Effects
The light source itself matters less than how you modify it. A bare flash pointed directly at a subject produces harsh, unflattering shadows. Add a modifier, and the entire mood of the image changes. Here is a breakdown of the most important light-shaping tools for indoor photography.
| Modifier | Best Used For | Shadow Quality | Portability |
| Softbox | Portraits, product shots | Very soft, gradual | Moderate |
| Umbrella | Broad ambient fill, group shots | Soft but spread out | High |
| Beauty Dish | Fashion, glamour portraits | Contrasty yet forgiving | Moderate |
| Grid / Snoot | Dramatic accents, spotlight effects | Hard, focused | Low |
| Bare Flash / Reflector | High-energy events, action shots | Harsh, directional | Very high |
Choosing the right modifier depends on your subject and creative vision. A softbox wraps light smoothly around a face, minimizing skin imperfections and creating a polished, professional look. A beauty dish offers a slightly more contrasty rendering that fashion photographers love because it adds depth and dimension. Grids and snoots concentrate light into a focused beam, perfect for highlighting a specific element — a product, a detail, or a background accent — without spilling light onto surrounding areas.
Indoor Lighting Setups for Different Genres
Portrait Photography Lighting
For indoor portraits, the classic Rembrandt lighting pattern places the key light at a 45-degree angle above and to the side of the subject, creating a distinctive triangle of light on the shadowed cheek. Butterfly lighting positions the light directly in front and above the subject, producing a butterfly-shaped shadow beneath the nose — a favorite for beauty and fashion work. Beginners should start with a single softbox at a 45-degree angle and a reflector on the opposite side to fill shadows gently.
Product Photography Lighting
Product shots demand even, controlled illumination that reveals texture, color, and detail without distracting reflections or hot spots. A common setup uses two softboxes positioned at 30- to 45-degree angles on either side of the product, with a white backdrop or gradient surface below. Adding a strip softbox as a rim or accent light separates the product from the background and adds a sense of three-dimensionality.
Real Estate and Interior Photography
Interior photographers face the challenge of balancing ambient room light with flash to produce images that look naturally inviting yet well-exposed. High Dynamic Range (HDR) bracketing combined with off-camera flash is a popular approach. Use a wide-angle flash bracket, diffuse the flash through a white umbrella, and expose for the ambient light separately before blending frames in post-processing for a balanced, magazine-quality result.
Common Indoor Photography Lighting Mistakes and How to Fix Them
Even experienced photographers fall into predictable traps when working with indoor light. Here are the most frequent errors and practical solutions:
- Using on-camera flash directly — This creates flat, harsh shadows and red-eye. Instead, bounce the flash off a white ceiling or wall, or mount it off-camera with a wireless trigger.
- Ignoring white balance — Mixed light sources produce ugly color shifts. Set a custom white balance or shoot in RAW so you can correct color temperature during editing.
- Overlighting the scene — Too much light eliminates dimension and makes images look artificial. Use flags, black cards, or distance to control spill and preserve natural contrast.
- Forgetting the background — A beautifully lit subject placed against a dark, unlit background looks disconnected. Light the background slightly or use a wide aperture to blur it and reduce contrast.
- Neglecting light stands and modifiers — Hand-holding lights is unstable and inconsistent. Invest in sturdy light stands and sandbags to secure every modifier in place.
Expert Tips for Rapid Improvement in Indoor Lighting
Here are actionable recommendations that experienced photographers swear by:
- Always shoot a test frame and review the histogram before committing to a final session.
- Invest in a gray card and a color checker chart to ensure accurate exposure and color reproduction every time.
- Practice the inverse square law — doubling the distance between your light and subject reduces light intensity to one-quarter, giving you precise control over falloff and background brightness.
- Build a small, portable lighting kit (one flash, one umbrella, one softbox, two light stands) that you can use anywhere indoors.
- Study the work of photographers you admire and reverse-engineer their lighting setups by analyzing shadow direction, highlight placement, and overall mood.
FAQ: Frequently Asked Questions About Indoor Photography Lighting
What is the best indoor lighting setup for beginners?
A single continuous LED panel or a speedlight with a small softbox positioned at a 45-degree angle to your subject is the simplest and most versatile starting point. Pair it with a white foam board as a fill reflector, and you immediately achieve professional-looking results without a steep learning curve.
How do I prevent harsh shadows in indoor portrait photography?
Increase the size of your light source relative to your subject by using a softbox or umbrella, or bounce a flash off a large white surface. The larger and more diffused the light source, the softer and more gradual the shadows become.
Can I shoot indoor photography with only natural light?
Absolutely. Many award-winning photographers work exclusively with window light. The key is to position your subject so the light falls at an angle that creates gentle dimension, and use a reflector to fill the shadow side. Avoid direct midday sun, which creates unflattering contrast.
What color temperature should I set for indoor photography?
For most indoor environments, set your white balance to around 3500K–4500K for tungsten or mixed lighting, or 5500K–6000K if you are primarily using daylight-balanced LED panels. Shooting in RAW gives you full flexibility to fine-tune color temperature later without quality loss.
How many lights do I really need for indoor photography?
One light is enough for compelling images when combined with reflectors and ambient bounce. Two lights (a key light and a fill or accent light) cover the vast majority of portrait and product scenarios. Three lights become useful for more complex setups such as high-key product photography or dramatic editorial portraits.
Conclusion: Master Indoor Light and Master Photography
Indoor photography lighting is not merely a technical necessity — it is a creative language. Every decision you make about direction, intensity, quality, and color temperature communicates mood, emotion, and visual storytelling. Whether you are working with the soft glow of a window, a single off-camera strobe, or a carefully arranged multi-light setup, the principles remain the same: shape the light intentionally, control what you can, and let the rest fall naturally. Start with the basics covered in this guide, experiment boldly, and within weeks you will notice a dramatic improvement in every image you capture indoors. The room is your studio; the light is your brush. Now go create something extraordinary.