


When it comes to food photography, the difference between a forgettable image and a mouthwatering masterpiece often comes down to one critical element: lighting. Food photography lighting is far more than just making sure your dish is visible — it is the art of shaping shadows, highlighting textures, and evoking emotions through carefully controlled light. Whether you are a home cook capturing your latest creation or a professional food stylist building campaigns for restaurants and brands, understanding how light interacts with your subject is the single most impactful skill you can develop. In this comprehensive guide, we will walk you through everything you need to know about food photography lighting, from foundational concepts to advanced techniques that will transform your images overnight.
Understanding Light in Food Photography
Before diving into equipment and setups, it helps to understand what light actually does in a food photograph. Light defines shape, depth, color, and mood. It draws the viewer’s eye to the hero ingredients and makes textures like crispy crusts, creamy sauces, and delicate herb garnishes come alive. Without proper light control, even the most beautifully plated dish can look flat, dull, or unappetizing.

There are two fundamental qualities of light every food photographer must understand:
- Hard light — Created by a small, direct light source, hard light produces sharp shadows and high contrast. It can emphasize texture but is often unforgiving on food surfaces.
- Soft light — Created by diffusing or enlarging a light source, soft light wraps gently around subjects, reducing harsh shadows and creating a more flattering, natural look.
Most professional food photographers prefer soft, directional lighting because it mimics the way sunlight falls through a window, giving dishes a natural and inviting appearance. The goal is almost always to create a balanced interplay of highlights and shadows that reveals the food’s best qualities without overwhelming the viewer.
Natural Light vs. Artificial Light for Food Photography
One of the first decisions every food photographer faces is whether to use natural light, artificial light, or a combination of both. Each approach has distinct advantages depending on your environment, budget, and creative goals.
Natural Light Food Photography
Natural light, especially window light, is the most accessible and often the most flattering light source for food. A single large window provides beautiful, soft, directional light that requires minimal equipment. However, natural light is unpredictable — it changes with the time of day, weather, and season. For consistent results, many photographers pair window light with sheer curtains or diffusion panels to control intensity and direction.
Artificial Lighting for Food Photography
Artificial light gives you complete control over intensity, direction, color temperature, and quality. Continuous LED panels, strobes, and speedlights are the three most popular options. LED panels are especially popular among food photographers because they allow you to see the lighting effect in real time, making it easier to fine-tune shadows and highlights.
The best approach for most photographers is a hybrid setup — using natural light as a base and supplementing with artificial sources to fill shadows or add creative accents.
When to Choose Each Light Source
| Factor | Natural Light | Artificial Light |
| Cost | Free, minimal equipment needed | Requires investment in lights and modifiers |
| Consistency | Changes throughout the day | Fully controllable and repeatable |
| Portability | Requires a window or outdoor space | Works in any environment, including studios |
| Creative Control | Limited to available light direction | Unlimited control over angle, intensity, and color |
| Best For | Casual shooting, lifestyle content, rustic aesthetics | Commercial work, branding campaigns, studio sessions |
Essential Lighting Equipment for Food Photography
You do not need an elaborate studio to take stunning food photos, but having the right tools makes a significant difference. Here is what you need to consider when building your food photography lighting kit.
- Continuous LED Panels — These are the go-to choice for most food photographers. They provide steady, cool-running light that lets you see exactly how your scene will look before capturing the shot. Look for panels with adjustable color temperature (bi-color LEDs) so you can match warm tungsten or cool daylight conditions.
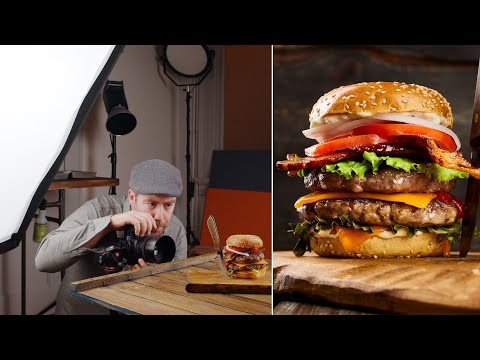
- Light Modifiers — Softboxes, diffusers, and reflectors are essential for shaping light. A softbox creates soft, even illumination, while a reflector bounces light into shadow areas to reduce contrast. A small collapsible reflector is one of the most affordable and impactful tools in any food photographer’s kit.
- Light Stands and Clamps — Stable positioning is critical in food photography, where even a slight shift in light angle can change the mood of an entire image.
- Color Gels and CTO Filters — These allow you to adjust the color temperature of your light source to match ambient light or create stylized color effects.
For beginners, a single LED panel and a five-in-one reflector are more than enough to get started. As you progress, you can add secondary lights, grids, and flags for more sophisticated control over your food photography light setup.
Lighting Setups for Different Food Types
Not all food looks best under the same lighting conditions. The texture, color, and composition of your dish should dictate your lighting approach. Here are some proven setups that professional food photographers use regularly.
Bright and Airy Food Photography
This popular style relies on abundant, even light with minimal shadows. It works beautifully for bright salads, light-colored desserts, and health-focused dishes. To achieve this look, use a large soft light source positioned to one side or above the food, and supplement with a reflector on the opposite side to bounce light back into the shadows. Keep the background bright and use light-colored props to maintain the airy feel.
Dark and Moody Food Photography
Dark and moody food photography uses controlled, low-key lighting to create drama and depth. This style is perfect for rich dishes like chocolate desserts, grilled meats, and hearty stews. Place a single directional light source at a low angle and use black flags or negative fill to block light from reaching the background and certain areas of the dish. The result is deep shadows and pockets of highlights that guide the viewer’s eye to the most appetizing parts of the food.
Overhead Flat Lay Lighting
For top-down or flat lay food photography, even overhead lighting is essential. A large softbox or LED panel positioned directly above the scene minimizes shadows and keeps the entire surface evenly lit. This setup is ideal for spread-style compositions featuring multiple dishes, ingredients, and props arranged on a surface.
Advanced Lighting Techniques for Food Photography
Once you have mastered the basics, these advanced techniques will help you create more dynamic and professional-looking food images.
Backlighting for Steam and Texture
Positioning a light source behind or behind and slightly above the food creates a beautiful rim of light that outlines the dish and can make steam, smoke, or garnishes glow. Backlighting is particularly effective for hot beverages, freshly baked bread, and grilled foods where atmospheric elements enhance the storytelling.
Using Negative Fill
Negative fill involves placing black cards or dark fabric on the side of your subject opposite the light source. This absorbs light and deepens shadows, adding dimension and contrast to your food photographs. It is a simple technique that dramatically improves the three-dimensional quality of your images.
Controlling Color Temperature
Color temperature, measured in Kelvin (K), affects the warmth or coolness of your images. Warmer light (around 3000–4000K) enhances the richness of reds, browns, and golden tones in food, while cooler light (5000–6500K) renders greens and whites with crisp clarity. Matching your light source’s color temperature to the natural mood of the food is a subtle but powerful way to elevate your images.
Common Food Photography Lighting Mistakes to Avoid
- Using direct, unmodified flash — On-camera flash creates harsh shadows and washed-out highlights that make food look unappetizing. Always diffuse your light or bounce it off a surface.
- Ignoring the background — Light spills onto your background and props just as much as it illuminates the food. Control stray light with flags, barn doors, or careful positioning.
- Overlighting the scene — Too much light flattens textures and removes the shadows that give food depth and dimension. Less is often more in food photography.
- Mixing incompatible color temperatures — Combining daylight-balanced LEDs with warm tungsten ambient light creates ugly color casts. Stick to a single white balance setting and light source temperature for consistency.
Final Thoughts on Food Photography Lighting
Mastering food photography lighting is a journey, not a destination. The most important thing you can do is practice observing how light behaves on different surfaces and textures. Pay attention to how sunlight moves through your kitchen throughout the day, experiment with a single LED panel and a reflector, and gradually build your confidence with more advanced setups. The light you choose will always matter more than the camera you use — invest in understanding it, and your food photographs will immediately stand out.
Remember that every dish tells a story, and lighting is the voice that brings that story to life. Whether you are working with the gentle glow of a kitchen window or a fully controlled studio rig, the principles remain the same: shape your light intentionally, respect the shadows, and let the food be the star.
Frequently Asked Questions About Food Photography Lighting
What is the best lighting setup for food photography on a budget?
The best budget-friendly food photography lighting setup is a single large window paired with a white foam board as a reflector. This costs virtually nothing and produces beautiful, soft, directional light that flatters almost any dish. Position your food about two to three feet from the window and use the foam board on the opposite side to bounce light into the shadows.
Do food photographers use flash or continuous light?
Most food photographers prefer continuous LED lights over flash because they can see the lighting effect in real time, which is crucial for making precise adjustments to food placement, styling, and light positioning. Flash can be used, but it requires additional modifiers and experience to achieve the soft, controlled look that food photography demands.
What color temperature is best for food photography lighting?
For most food photography, a color temperature between 4000K and 5500K produces natural, appetizing results that closely mimic daylight. Warmer temperatures around 3200K work well for baked goods and comfort food, while cooler temperatures above 5500K suit fresher, lighter dishes like salads and seafood.
How do I light food photography for Instagram without a studio?
For Instagram food photography, set up near a large window during overcast conditions for naturally soft light. Use a white poster board or foam core as a reflector to fill in shadows, and keep the background simple and uncluttered. A small LED panel with a diffusion layer can supplement natural light when the window light is not enough.
What light modifier is best for food photography beginners?
A simple diffusion panel or a small softbox is the best light modifier for beginners. It transforms a harsh point light source into broad, soft illumination that is forgiving and flattering on food. A 5-in-1 reflector with a white diffusion panel is an affordable and versatile option that works for most food photography situations.