


Continuous lighting photography has transformed the way photographers of every skill level approach portrait, product, and video work. Unlike flashes or strobes that emit a burst of light for a fraction of a second, continuous lighting stays on, giving you real-time feedback on shadows, highlights, and overall exposure before you ever press the shutter. Whether you are a solo content creator shooting YouTube videos, a studio portraitist refining your craft, or a product photographer making catalog imagery, understanding how to leverage continuous light sources for photography can dramatically elevate your creative output. This guide breaks down everything you need to know — from basic concepts to advanced techniques — so you can start shooting with confidence using permanent light setups.
What Is Continuous Lighting Photography and Why Does It Matter?
At its core, continuous lighting photography refers to any lighting technique where the light source remains on throughout the capture process. This stands in contrast to electronic flash or strobe units that fire a single, intense burst. Continuous light for photography includes LED panels, tungsten bulbs, fluorescent tubes, and even practical fixtures like desk lamps or ring lights. The defining advantage is visibility: you see exactly how light falls on your subject in real time, which simplifies shadow control, color temperature management, and creative experimentation.
Many photographers find that working with perpetual light setups accelerates their learning curve significantly. Because the light is always visible, you can observe how moving a softbox two inches to the left changes the catchlight in a subject’s eyes or how shifting a reflector alters the fill ratio. That immediacy makes continuous lighting an outstanding teaching tool and a reliable production choice for professionals shooting on tight schedules.
Types of Continuous Light Sources for Photography
Not all continuous lighting solutions are created equal. Each technology brings its own color temperature, intensity profile, and handling characteristics. Understanding these differences helps you select the right gear for your specific genre and environment.
LED Panels and LED Monolights
LED-based continuous light photography equipment is the most popular category today, and for good reason. Modern LED panels offer full-spectrum output, adjustable color temperature ranging from warm tungsten tones to cool daylight balanced settings, and impressive dimming controls. Many professional-grade LEDs are bi-color or full RGB, allowing you to shift hues on the fly without gel filters. Popular examples include boards from brands like Aputure, Nanlite, and Godox, which are widely used in both studio and location shoots.
Tungsten and Incandescent Lights
Tungsten fixtures have been a staple of studio photography for decades. They produce a warm, rich light with deep reds and soft shadows, making them ideal for classic portrait lighting setups. However, tungsten lights run extremely hot, consume significant power, and require careful heat management, especially during longer sessions or in small, poorly ventilated spaces.
Fluorescent and Tube Lights
Fluorescent continuous lighting systems were once a preferred option for video work, but they have largely been overtaken by LEDs in the photography world. Issues like flickering at certain shutter speeds and a greenish color cast posed challenges that modern LED alternatives have mostly eliminated. That said, some photographers still use specialist fluorescent tubes for specific diffusion effects.

Practical and Household Light Sources

An underappreciated aspect of using continuous lighting creatively involves repurposing everyday fixtures. Desk lamps, clamp lights, string lights, and even candles can serve as beautifully colored point sources for mood-driven imagery. Many commercial photographers deliberately incorporate practical lights into their setups to add authenticity and layered light depth.
Continuous Lighting vs Flash Photography: Head-to-Head Comparison
Choosing between continuous light sources and strobes depends heavily on your subject matter, workflow, and creative intentions. Below is a direct comparison that highlights the key differences.
| Feature | Continuous Lighting | Flash / Strobe |
| Visibility During Setup | On at all times; real-time preview | Burst only; requires test firing |
| Learning Curve | Gentler; intuitive shadow control | Steeper; requires understanding of sync timing |
| Portability | Varies; LEDs are lightweight, tungsten is heavy | Strobes can be bulky with battery packs |
| Power Output | Generally lower per unit; stacking required | Very high per burst; freezes fast action |
| Video Compatibility | Excellent; seamless for hybrid shooters | Possible with HSS but more complex |
| Heat Output | LEDs cool; tungsten gets hot | Minimal heat during captures |
| Cost Range | Entry models affordable; pro units moderate | Strobes with triggers add cost |
The table above illustrates that there is no single “better” choice — only the better choice for your workflow. Many modern photographers, especially those working in hybrid stills-and-video spaces, own both flash and continuous kits and switch between them based on the specific project.
Best Continuous Lighting Setups for Beginners
If you are just starting out with continuous lighting for photography, the most important decision is not which brand to buy — it is which single light source will give you the most versatility. A bi-color LED panel with adjustable dimming and a built-in diffusion panel covers an enormous range of scenarios for very little investment.
- One Light + Reflector: Place your LED panel at a 45-degree angle to your subject and use a white reflector on the opposite side for fill. This classic setup teaches you about the inverse square law and shadow shaping without overwhelming complexity.
- Two-Point Key and Fill: Add a second, weaker light on the shadow side to reduce contrast. This introduces you to ratio control and is the foundation of most portrait lighting techniques.
- Key plus Background Light: Use your main light for the subject and a separate small LED to illuminate the background independently. This separation technique adds depth and dimension to flat scenes.
Pro tip: always shoot in RAW format when working with any permanent light source photography setup. Real-time previews on your camera screen can be misleading, especially with LED flicker or mismatched white balance. RAW gives you the latitude to correct exposure and color precisely in post-production.
Intermediate Techniques for Shaping Continuous Light
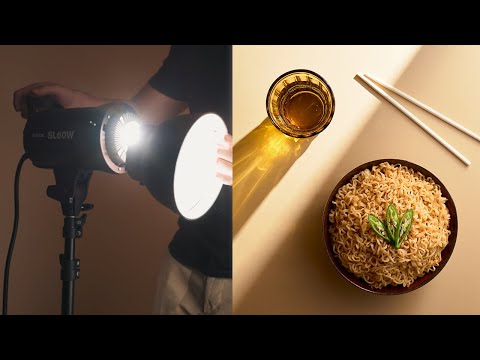
Once you are comfortable with a single light source, the next step is learning how to modify it. Modifiers are what separate a flat, uninspired image from one with dimension, drama, and professional polish.
- Softboxes: These attach directly to your LED panel or light stand and diffuse harsh light into a broad, even glow. A large softbox produces gentle shadow transitions that are ideal for beauty and portrait work.
- Barn Doors: Attachable metal flaps let you block light precisely, preventing spill onto backgrounds or unwanted areas. They are essential for controlling light direction in tight studio spaces.
- Diffusion Fabric and Scrims: Layering translucent material over your light source softens the beam without changing its color temperature. DIY scrims made from white bedsheets work surprisingly well for trial setups.
- Snoots and Grids: These accessories focus light into a tight beam or controlled cone, making them perfect for dramatic accent lighting on specific subjects or background elements.
Expert tip: When using continuous lights, always monitor your shutter speed as well as your aperture. Because the light is constant, longer exposures allow you to use lower ISO values, but ambient light contamination becomes a bigger factor. Use a flag or black fabric behind your subject to block unwanted background light and maintain clean separation.
Advanced Continuous Lighting Techniques for Professional Work
For experienced photographers, advanced continuous light photography techniques unlock a level of creative control that resembles cinematography more than traditional still photography.
Light Painting with Long Exposures
Because continuous lights stay on, you can use them to actively paint light across a scene during a long exposure. This technique works brilliantly for landscapes, architecture, and creative portraits where you want to trace light patterns across a subject or environment. A handheld LED wand or a small RGB panel moved deliberately during a 10-30 second exposure produces striking, almost sculptural results.
Color Gels and Mixed Temperature Setups
Advanced photographers often gel different light sources to create complementary or contrasting color temperatures in the same frame. Placing a warm amber gel on a background light and keeping the key light neutral daylight creates a cinematic split-tone effect that is extremely popular in commercial and editorial work. Many modern LED panels accept magnetic gel kits or have built-in RGB color mixing, streamlining this process considerably.
Simulating Natural Light at Any Time of Day
One of the most powerful applications of continuous lighting setups for photography is the ability to mimic the color and angle of sunlight at any hour. By adjusting your LED panel’s color temperature to match golden hour warmth or midday coolness, and positioning it at the same elevation as the sun would be, you can achieve entirely controllable “natural” lighting in a studio or on location regardless of weather or time of day.
Practical Recommendations and Expert Setup Tips
Drawing from years of professional practice, here are several recommendations that consistently deliver results for photographers working with continuous light in photography:
- Invest in a quality light stand with a boom arm. The ability to position your light above and behind the subject opens up a huge range of rim lighting and hair light possibilities.
- Always carry a handheld color meter or use your camera’s custom white balance tool. Continuous lights — especially cheaper LEDs — often have slight green or magenta tinting that the human eye adapts to but the camera does not.
- Use a dimmer or variable power supply rather than simply moving your light further away. Dimming changes the light’s apparent color temperature slightly on some LED panels, so consistent power adjustment keeps your color output predictable.
- Build a small kit of gels, diffusion materials, and reflectors before buying additional light fixtures. Modifiers often have a bigger impact on image quality than adding a second or third light source.
- Review your shots on a calibrated monitor frequently. Continuous light allows you to evaluate exposure and color in real time, but any color grading you do on an uncalibrated screen will not translate reliably to other devices.
FAQ: Continuous Lighting Photography Frequently Asked Questions
1. What continuous lighting is best for food photography?
LED panels with high Color Rendering Index (CRI) ratings above 95 are the top choice for food photography continuous lighting. Because you need accurate color reproduction of ingredients, sauces, and textures, LEDs with full-spectrum output and no UV or IR emission prevent unwanted heating of delicate food items during long setup sessions.
2. Can I use continuous lighting for outdoor portrait photography?
Absolutely. Many photographers use portable LED panels to supplement or overpower sunlight when shooting portraits outdoors. Positioning a strong LED opposite the sun creates a controlled fill effect, and because the light is continuous, you can fine-tune the ratio between ambient sunlight and your artificial source in real time.
3. How many watts of continuous light do I need for a home studio?
For most portrait and product work, a single LED panel in the 50 to 100 watt range is sufficient when combined with modifiers. You need more wattage only if you are shooting at very high f-stops or with fast shutter speeds in bright environments. For beginners, a 60-watt bi-color LED starting kit covers an enormous range of applications.
4. Is continuous lighting better than flash for video work?
Yes, for the vast majority of video applications. Continuous lights provide a constant illumination that your camera sensor captures smoothly across every frame. Flash systems require specialized high-speed sync or external triggers to work with video, and they produce a strobe-like effect that is difficult to blend with ambient motion.
5. Do continuous lights cause heat issues during long sessions?
This depends entirely on the technology. LEDs run very cool and can stay on for hours without any heat concern. Tungsten bulbs, however, generate significant heat and can discolor lighter fabrics, melt plastic modifiers, or create an uncomfortable shooting environment. Always check the recommended coverage area and maximum run time before purchasing any continuous lighting system for photography.
Conclusion
Continuous lighting photography offers a uniquely accessible and intuitive path to creating stunning images across virtually every genre. From the simplicity of a single LED panel paired with a white bounce card to the sophisticated color-graded setups used in high-end commercial and cinematic work, permanent light sources give photographers an unmatched level of real-time control. Whether you are choosing your first light kit or refining a professional studio workflow, the principles discussed in this article — modification, ratio control, color temperature management, and practical positioning — provide a solid foundation for consistent, high-quality results. As you experiment and refine your approach, you will find that continuous lighting becomes not just a tool, but a creative partner that keeps you engaged and inspired throughout every shoot.