


Broad lighting photography is one of the most powerful and versatile portrait lighting setups you can add to your creative toolkit. Whether you are a beginner just learning the fundamentals of studio lighting or an experienced photographer looking to refine your portraiture techniques, understanding how broad lighting works will transform the way you shape faces and tell stories through light. Unlike flat, on-camera flash setups that wash out dimension, broad lighting deliberately sculpts the face by illuminating the widest, most prominent side toward the camera. This creates a sense of depth, draws attention to the subject’s features, and gives portraits a polished, professional quality that audiences instinctively respond to. In this comprehensive guide, we will break down every aspect of broad lighting photography—from core principles and setup steps to common mistakes and advanced techniques—so you can start using this method with confidence and purpose.
What Is Broad Lighting Photography?
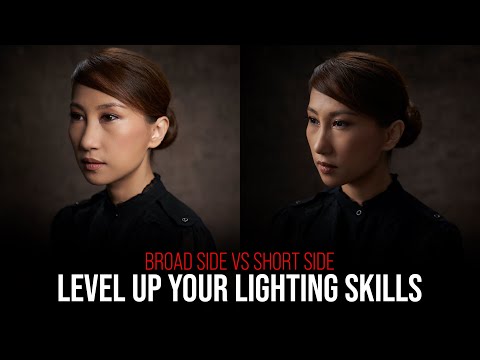
Broad lighting is a portrait lighting pattern in which the primary light source illuminates the side of the subject’s face that is turned toward the camera. The term “broad” refers to the wide, visible portion of the face that catches the light, making it the dominant visual area in the frame. This is the opposite of narrow lighting, where the lit side faces away from the camera, creating a slimming, more intimate effect. Broad lighting photography is especially popular in editorial portraiture, headshots, fashion work, and environmental portraits where the photographer wants to convey openness, confidence, and dimensionality.
When light falls on the broad side of the face, it expands the perceived width of the subject. This makes broad lighting ideal for subjects who have naturally thin or narrow faces, or when the creative goal is to emphasize presence and authority. The key principle is simple: whatever side of the face receives the most light and is visible to the lens becomes the dominant, “broad” side of the composition.

How Broad Lighting Works: Core Principles
Understanding Light Direction and Face Orientation
The foundation of broad lighting is the relationship between three elements: the light source, the subject’s face angle, and the camera position. To set up broad lighting, the photographer positions the key light so that it falls on the side of the face that is already rotated toward the lens. This means the subject turns slightly so that the shadow side recedes, and the illuminated side faces the camera more directly.
Here is a step-by-step breakdown of how the geometry works:
- The subject turns their face approximately 30 to 45 degrees away from the camera.
- The key light is placed on the side of the face that is now closer to the camera.
- The shadow falls on the far side of the face, away from the lens.
- The camera captures the broad, lit side as the dominant visual plane.
The Role of Subject Pose and Head Angle
Body posture and chin tilt play a surprisingly significant role in how broad lighting reads in the final image. A slight chin drop can elongate the neck and add elegance, while a subtle turn of the shoulders can complement the face angle. Photographers should always consider the subject’s bone structure and facial proportions before finalizing the pose. Broad lighting on a subject with a wide jawline, for example, might need to be balanced carefully so the face does not appear overly dominant in the frame.
Broad Lighting vs. Narrow Lighting: Key Differences
Understanding the contrast between broad lighting and narrow lighting is essential for any portrait photographer. The two techniques produce dramatically different visual effects, and knowing when to use each one separates amateurs from professionals. Below is a detailed comparison table that highlights the critical distinctions.
| Aspect | Broad Lighting | Narrow Lighting |
| Lit Side | Faces toward the camera | Faces away from the camera |
| Shadow Side | Turns away from the camera | Faces toward the camera |
| Perceived Face Width | Makes the face appear wider | Makes the face appear slimmer |
| Best For | Thin faces, editorial, authoritative looks | Full faces, slimming effect, moody portraits |
| Shadow Placement | On the far side, away from the lens | On the near side, closer to the lens |
| Mood | Open, confident, expansive | Intimate, moody, restrained |
| Common Uses | Headshots, fashion, actor portfolios | Beauty photography, editorial close-ups |
The choice between broad and narrow lighting ultimately depends on the creative intent, the subject’s facial structure, and the story the photographer wants to tell. Many professional photographers keep both techniques in their repertoire and switch between them seamlessly depending on the session.
When and Why to Use Broad Lighting
Best Scenarios for Broad Lighting Portraits
Broad lighting shines in specific situations where its characteristic qualities serve the image best. Here are the most common scenarios where photographers reach for this lighting pattern:
- Thin or narrow facial structures — Broad lighting adds visual width and fullness to faces that might otherwise appear too slim in the frame.
- Editorial and fashion photography — The expansive, confident look of broad lighting aligns perfectly with high-fashion and magazine-style aesthetics.
- Actor and model headshots — Casting directors and agencies often prefer headshots that convey strength and presence, and broad lighting delivers exactly that.
- Corporate and executive portraits — The authoritative quality of broad lighting communicates leadership and self-assurance.
- Environmental portraits — When the subject is positioned within a broader scene, broad lighting helps anchor the face as the visual focal point.
It is important to note that broad lighting is generally not recommended for subjects with already wide or round faces, as it can emphasize width in a way that feels unflattering. In those cases, narrow lighting or butterfly lighting patterns are usually a better choice.
Setting Up Broad Lighting: A Practical Step-by-Step Guide
Follow this practical workflow to set up broad lighting for your next portrait session:
- Position your subject — Ask the subject to turn their face roughly 30 to 45 degrees away from the camera. The shoulder closer to the camera can drop slightly to add natural dimension.
- Place your key light — Set the main light on the side of the face that is now closest to the camera. Use a softbox or umbrella for a flattering, diffused quality.
- Adjust the light angle — Fine-tune the light position until the shadow falls naturally along the far cheek and nose, creating a gentle gradient on the face.
- Add a fill light or reflector — Place a reflector on the shadow side or use a second light at reduced power to control contrast and preserve shadow detail.
- Position the background light — If using a separate background light, aim it to create separation between the subject and the backdrop without spilling onto the face.
- Meter and test — Take test shots, checking the histogram and the shadow-to-highlight balance. Adjust power ratios until the broad side of the face is properly exposed and the shadows have a pleasing density.
Common Mistakes and How to Avoid Them
Even experienced photographers occasionally run into issues when working with broad lighting. Here are the most frequent mistakes and how to correct them:
- Over-illuminating the broad side — This flattens the image and eliminates the dimensionality that broad lighting is meant to create. Use a flag, grid, or barn doors to control light spill.
- Ignoring catchlights — The reflection of the light source in the subject’s eyes should appear in the eye on the broad side. This subtle detail adds life and connection to the portrait.
- Forgetting the shadow edge — The transition between the lit and shadow sides should be gradual and intentional. A harsh, abrupt line can look amateurish and distracting.
- Using the wrong modifier — A bare strobe creates unflattering, hard shadows on the broad side of the face. Always use a modifier like a softbox, beauty dish, or diffusion panel.
Expert Tips for Mastering Broad Lighting Photography
Take your broad lighting portraits to the next level with these professional insights:
- Experiment with Rembrandt and broad lighting combinations — Adding a small triangle of light under the shadow-side eye while keeping the broad-side illumination creates a rich, classical portrait look.
- Use negative fill — Placing a black V-flat or flag on the shadow side deepens the contrast and adds dramatic edge to the broad lighting setup.
- Shoot through a colored gel — A subtle warm or cool gel on the key light can shift the mood of the broad-lit side and add artistic depth.
- Pay attention to the catchlight shape — The shape of the reflection in the eye tells the viewer a lot about your lighting setup. Round catchlights from softboxes tend to be more universally flattering than irregular ones.
- Practice with window light — You do not need a studio to master broad lighting. A large window and a white reflector can replicate the setup beautifully, making it an excellent exercise for beginners.
Frequently Asked Questions
What is broad lighting used for in portrait photography?
Broad lighting is used in portrait photography to add visual width to the subject’s face and create an open, confident, and authoritative mood. It is especially effective for thin or narrow facial structures, editorial portraits, and headshots where the photographer wants the subject to appear strong and present.
How do you set up broad lighting at home without studio equipment?
You can set up broad lighting at home using a large window as your key light. Position the subject so the broad side of their face faces the window, and use a white poster board or reflector on the shadow side to bounce light back gently. This low-cost setup mimics professional studio results and is perfect for beginners practicing portrait lighting.
Is broad lighting suitable for all face shapes?
No, broad lighting is not universally suitable for all face shapes. It works best on thin or narrow faces because it adds perceived width. For subjects with already wide or round faces, narrow lighting or loop lighting patterns tend to be more flattering, as they create a slimming effect rather than emphasizing width.
What is the difference between broad lighting and short lighting?
Broad lighting and short lighting are essentially the same concept described from opposite perspectives. Broad lighting refers to the lit side of the face being the wider, camera-facing portion, while short lighting refers to the shadow side being the narrower portion that faces the camera. They are two sides of the same coin in portrait lighting terminology.
Can broad lighting be combined with Rembrandt lighting?
Yes, broad lighting can be combined with Rembrandt lighting to create a sophisticated, classical portrait effect. In this hybrid setup, the key light is positioned so that it illuminates the broad side of the face while also casting a small, triangular patch of light on the shadow-side cheek beneath the eye. This combination adds depth, drama, and a timeless quality to portrait photographs.
What modifier works best for broad lighting setups?
A softbox is widely considered the best modifier for broad lighting setups because it produces a soft, even gradient of light across the broad side of the face. A beauty dish offers a slightly more contrasty, sculpted look that many fashion photographers prefer. For a more dramatic effect, a strip softbox can elongate the catchlight and add a cinematic quality to the broad-lit portions of the portrait.
Conclusion
Broad lighting photography is a foundational technique that every portrait photographer should understand and master. Its ability to add width, dimension, and confidence to a subject’s appearance makes it indispensable for headshots, editorial work, and creative portraiture. By understanding the core principles of face orientation, light placement, and shadow control—and by practicing the setup steps outlined in this guide—you can start producing portraits that stand out for their professional quality and artistic intention. Avoid common pitfalls, experiment with modifiers and fill techniques, and always tailor your broad lighting setup to the unique features of each subject. With consistent practice and a keen eye for light, broad lighting will become one of the most reliable and expressive tools in your photography arsenal.