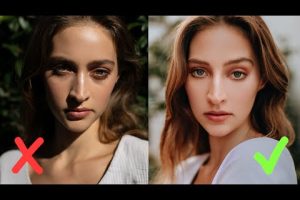
Lighting is the single most powerful variable that separates amateur photographs from stunning, professional-quality images. Whether you are shooting portraits, landscapes, products, or street photography, understanding good lighting for pictures can transform your entire creative output. The way light falls on your subject — its direction, intensity, color temperature, and quality — determines mood, depth, texture, and even the emotional impact of your final image. Yet despite its importance, lighting remains one of the most misunderstood aspects of photography for many enthusiasts. This guide breaks down everything you need to know about mastering light for photographs, from fundamental principles to advanced techniques that working photographers use every day. Whether you are just getting started or looking to refine your craft, this article covers practical strategies you can apply immediately.
Why Lighting Matters More Than Your Camera
Many beginners obsess over camera bodies, lenses, and megapixel counts, but experienced photographers know that light makes or breaks an image. A $500 camera with perfect lighting will always outperform a $5,000 setup with bad light. The reason is simple: your camera sensor records photons, and the quality of those photons directly determines image quality. Good lighting reveals detail, creates flattering shadows, enhances skin tones, and adds dimension that flat or harsh light simply cannot achieve.
Consider the difference between direct midday sunlight and soft overcast light. Under the harsh sun, your subject gets blown-out highlights and deep, unflattering shadows with hard edges. Under a cloudy sky, light wraps around the subject gently, preserving texture and producing balanced exposure. This is why photographers chase the “golden hour” — the period shortly after sunrise and before sunset — when the sun sits low and produces warm, diffused rays that make almost any subject look extraordinary.
Types of Light You Need to Understand
Before diving into setups, you need a solid grasp of the different characteristics that define light. Not all light is created equal, and each type produces distinct visual outcomes.
Natural Light vs Artificial Light
Natural light comes from the sun and changes constantly based on weather, time of day, season, and geographic location. It is free, abundant, and inherently beautiful when used correctly. Artificial light refers to any man-made source — strobes, continuous LED panels, flash units, ring lights, and even household lamps. Artificial sources give you complete control over intensity, direction, and color temperature.
Hard Light vs Soft Light
Hard light creates sharp, well-defined shadows and high contrast. It comes from small, direct light sources like the bare sun or an unfiltered flash pointed at your subject. Soft light wraps around subjects gently, producing gradual shadow transitions and lower contrast. Clouds, large softboxes, and shaded areas all create soft light. For most portrait and product photography, soft light is preferred because it minimizes skin imperfections and creates a polished look.
Direction of Light

The angle at which light hits your subject changes everything:
- Front lighting — illuminates the face evenly, minimizes shadows, but can look flat
- Side lighting — creates depth and dimension by highlighting one side of the face or object
- Back lighting — places the light source behind the subject, creating silhouettes or a glowing rim effect
- Top lighting — mimics noon sun, often unflattering for portraits due to under-eye shadows
- Butterfly lighting — light positioned above and in front, creating a butterfly-shaped shadow under the nose, popular in glamour photography

Mastering Natural Light for Outdoor Photography
Natural light is the foundation of photography, and learning to work with it is arguably the most valuable skill any photographer can develop. You do not need expensive gear to capture breathtaking images — you need an understanding of how sunlight behaves throughout the day.
Best Times of Day for Outdoor Lighting
The golden hours — roughly the first hour after sunrise and the last hour before sunset — provide warm, directional light that adds richness and depth to photographs. During these windows, the sun sits low on the horizon, scattering light through more atmosphere, which reduces harshness and introduces beautiful warm tones.
For evenly lit, low-contrast images, shoot on overcast days. Cloud cover acts as a giant softbox, diffusing sunlight uniformly across your scene. This is particularly excellent for portrait photography, macro work, and forest or woodland scenes where dappled light would create distracting patterns.
Using Reflectors and Diffusers Outdoors
Even in natural light settings, a simple reflector can completely change the quality of light on your subject. A white reflector bounces sunlight back into shadow areas, filling in dark tones without adding artificial warmth. Silver reflectors provide a brighter, more specular bounce, while gold reflectors add warmth similar to golden hour tones. Pairing a reflector with a diffuser panel (a translucent fabric that softens direct sunlight) gives you even more control over harsh outdoor conditions.
Artificial Lighting Setups for Indoor and Studio Photography
When natural light is insufficient or unavailable, artificial lighting becomes your best friend. The key is understanding how to position and modify light sources to achieve professional results.
Essential Lighting Equipment for Beginners
If you are just starting with artificial light, you do not need a massive kit. Here is what covers most use cases:
- One continuous LED light panel — adjustable brightness and color temperature, perfect for beginners learning light placement
- A single flash or strobe unit — powerful and portable, ideal for freezing motion and working in bright environments
- A light stand and umbrella or softbox — these modifiers transform a bare light into soft, directional illumination
- A reflector disc — inexpensive and effective for bounce-fill lighting
The Three-Point Lighting Setup
The three-point lighting setup is the cornerstone of studio and portrait photography. It uses three distinct light sources:
- Key light — the primary, brightest source placed at roughly 45 degrees to one side of the subject
- Fill light — a softer, less intense light on the opposite side to reduce shadow depth
- Rim or hair light — positioned behind the subject to create a glowing edge that separates them from the background
This setup works for headshots, product shots, video calls, and cinematic photography. Adjusting the ratio between key and fill light lets you control contrast and mood — more fill equals softer, more flattering results; less fill creates dramatic, high-contrast images.
Color Temperature and White Balance
Light has a color temperature measured in Kelvin (K), and getting this right is essential for accurate, natural-looking photographs. Warm light (around 2700K–3500K) comes from incandescent bulbs and sunset light, casting orange and amber tones. Cool light (5500K–6500K) resembles daylight and appears blue-white. Mixed lighting — where warm and cool sources exist in the same frame — is one of the biggest challenges photographers face and often leads to unnatural color casts.
Always set your white balance intentionally in-camera or correct it during post-processing. Shooting in RAW format gives you the most flexibility to adjust color temperature later without degrading image quality.
Lighting Comparison Table for Common Scenarios
| Scenario | Best Light Type | Recommended Setup | Common Mistakes |
| Portrait at Home | Soft natural or LED panel | Window light + reflector, 45° angle | Shooting in direct overhead light |
| Product Photography | Softbox with diffuser | Two softboxes at 30° angles | Harsh reflections on glossy surfaces |
| Outdoor Portraits | Golden hour or overcast | Open shade + reflector fill | Squinting from direct sun |
| Real Estate Interiors | Mixed natural and flash | Balanced window light + off-camera flash | Underexposed windows, overexposed interiors |
| Social Media Content | Ring light or soft LED | Direct frontal ring light at eye level | Ring light catchlights in eyes looking unnatural |
Expert Tips That Elevate Your Lighting Game
Here are actionable recommendations from experienced photographers that will immediately improve your results:
- Shoot facing the light first — always identify the dominant light source in your scene before positioning your subject
- Turn off overhead fluorescents — mixed artificial light sources create ugly color casts that are difficult to fix in editing
- Use the inverse square law — light intensity drops dramatically as distance increases, meaning moving your light twice as far away reduces its power to one-quarter
- Bounce, do not direct — aim your flash or LED at a white ceiling or wall to create large, soft sources
- Watch the background — even perfect light on your subject fails if the background is blown out or distracting
- Shoot during blue hour for moody images — the period just after sunset or before sunrise provides cool, atmospheric tones that work beautifully for dramatic landscapes and urban photography
Common Lighting Mistakes Beginners Make
Avoiding these frequent errors will save you countless hours of editing and frustration:
- Using the camera’s built-in pop-up flash directly — it creates harsh shadows and red-eye
- Ignoring light direction and placing the subject with light coming from behind with no fill
- Mixing daylight and tungsten bulbs without correction, resulting in split color temperatures
- Underexposing to preserve highlights but losing shadow detail that cannot be recovered
- Placing the subject too close to a background when using flash, causing uneven lighting across the scene
Conclusion
Mastering good lighting for pictures is a journey, not a destination. Every shooting scenario presents unique challenges, and the willingness to experiment with light direction, modifiers, and timing will set you apart from photographers who rely entirely on automatic settings and post-processing fixes. Start with natural light, invest in one or two affordable modifiers, and gradually build your artificial lighting knowledge as your confidence grows. The difference in your images will be immediate and dramatic.
FAQs About Good Lighting for Pictures
What is the best lighting for taking pictures indoors?
Window light is the most accessible and flattering indoor light source for photography. Position your subject perpendicular to the window and use a white reflector on the opposite side to fill in shadows. If you need more control, a single LED panel with a softbox modifier provides excellent results for portraits and product shots.
How can I improve my lighting without buying expensive equipment?
You can dramatically improve lighting using household items. Hang a white bedsheet over a window for instant diffusion, use aluminum foil taped to cardboard as a DIY reflector, and turn off mixed artificial light sources to eliminate color casts. Even repositioning your subject closer to a window can transform a mediocre photo into a professional-looking image.
What lighting setup is best for portrait photography?
The most universally flattering setup for portraits is soft, directional light at a 45-degree angle to the subject with fill light on the opposite side to control shadow depth. In natural light, this translates to shooting in open shade during golden hour with a reflector. In a studio, a single softbox as the key light and a second, dimmer light or reflector as fill produces polished, magazine-quality results.
Why do my pictures look flat even with good lighting?
Flat images usually result from light hitting the subject evenly from the front with no directional variation. Introduce side lighting, use a flag to block light from one side, or position your subject at an angle relative to the light source. Adding a rim or hair light behind the subject creates separation and dimension that prevents the “flat” look.
How does light color temperature affect my photos?
Color temperature determines the warmth or coolness of your image. Low Kelvin values (2700K–3500K) produce warm, amber tones ideal for cozy indoor portraits and golden hour shots. Higher values (5500K–6500K) produce neutral or cool tones resembling daylight. Mismatched color temperatures in a single scene create confusing, unnatural color casts that should be corrected in-camera through white balance settings or in post-processing.