When you step into the world of professional photography, understanding how to manipulate light is what separates a casual snapshot from a striking visual narrative. Among the many lighting techniques at a photographer’s disposal, high key lighting in photography stands out for its dreamy, luminous aesthetic that immediately captivates the viewer. If you have ever admired those radiant, almost ethereal portraits or the vibrant product shots that seem to float effortlessly on the page, you have witnessed the magic of a carefully executed high key lighting setup. This style completely eliminates harsh shadows and deep tones, replacing them with a seamless wash of brightness and an overwhelming sense of joy, purity, or optimism. Whether you are capturing fashion editorials, newborn portraits, or commercial product photography, mastering high key lighting can transform your portfolio into a visual feast that resonates deeply with modern audiences. Let us dive deep into what makes this technique so powerful and how you can implement it like a seasoned professional.
What Exactly Is High Key Lighting in Photography?

Defining the High Key Aesthetic
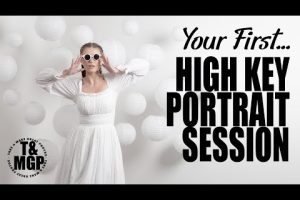
At its core, high key photography is a style that relies on a lighting ratio of 1:1 or very close to it. This means the difference between the darkest shadows and the brightest highlights is minimal, resulting in a bright, low-contrast image that feels light, airy, and optimistic. To the untrained eye, a high key image might look accidentally overexposed, but that is precisely the misconception we need to debunk. Overexposed lighting in high key photography is carefully controlled, not accidental. The goal is to illuminate the subject evenly while minimizing shadows, resulting in a clean, polished finish that draws the viewer’s eye directly to the subject without any distracting clutter.
Historically, high key lighting was born out of necessity in the film industry, where directors needed to fill massive sound stages with soft, even light to avoid harsh shadows on actors and minimize the look of heavy makeup. Today, photographers have adopted this approach across various genres, from corporate headshots to lifestyle branding. By flooding your scene with ambient light or strategically placing multiple light sources, you eliminate the moody, heavy atmosphere typically associated with traditional photography, opting instead for a bright and airy photography style that feels fresh, contemporary, and highly engaging.
High Key vs Low Key Lighting: The Core Differences
Before you commit to a lighting setup, it is crucial to understand where high key lighting fits in the spectrum of photographic lighting techniques. Comparing high key vs low key photography helps clarify the exact mood, technical requirements, and emotional impact you will need to achieve for a specific shoot.
| Characteristic | High Key Lighting | Low Key Lighting |
| Tonal Range | Bright, luminous, and low contrast | Dark, moody, and high contrast |
| Lighting Ratio | 1:1 to 2:1 (very flat) | 5:1 to 8:1 (dramatic falloff) |
| Shadow Detail | Minimal to no shadows | Deep, hard shadows with blocked blacks |
| Common Moods | Joy, innocence, purity, clean | Drama, mystery, tension, heavy |
| Background | White or very light gray | Black or very dark gray |
Essential Gear for a High Key Lighting Setup
Executing a flawless high key lighting setup requires specific equipment designed to control and amplify light efficiently. You do not need a massive, expensive studio to start, but having the right gear makes a world of difference in achieving that signature luminous quality.
- Softboxes or Umbrellas: These are the holy grail of high key photography. They diffuse light extensively, ensuring there are no hard shadows on your subject and creating a smooth, flattering illumination.
- Background Illumination: You need separate lighting for your backdrop. To achieve that pure white background, the background must be lit two to three stops brighter than your subject, ensuring it reads as clean white in the final image.
- Flash Strobes: Continuous lights can work, but studio strobes give you the intense power needed to overpower ambient light and freeze motion, which is essential for sharp, high-key shots.
- Light Meters: Because high key relies on precise exposure and flat lighting ratios, a handheld incident light meter is indispensable for ensuring your background and subject are balanced perfectly.
- Reflectors: Large white reflectors are perfect for bouncing fill light back into shadow areas, maintaining that seamless, low-contrast look without adding extra lighting stands.
Step-by-Step Guide to Creating High Key Lighting
Setting up a high key lighting environment can seem daunting at first, but breaking it down into manageable steps simplifies the process immensely. Here is how the pros approach a studio lighting session to ensure flawless results every time.
- Set Your Background: Start by illuminating your white backdrop. Position your background lights so the paper or canvas is evenly lit and pure white, avoiding any gray patches that might distract from the subject or pull focus away from the main point of interest.
- Position Your Key Light: Place your main softbox at a 45-degree angle to your subject. Keep it elevated slightly to cast minimal shadows on the face or product, maintaining that signature high key look and ensuring the light wraps evenly around the form.
- Add Fill Light: Place a second light on the opposite side at a lower power, or use a large reflector to bounce light back into the shadows. This step keeps the lighting ratios extremely flat and prevents any unwanted dark spots.
- Meter for Exposure: Take a light reading off your subject’s face or the product. Ensure the exposure is bright but retains subtle texture—avoid clipping the highlights completely on the skin or fabric, as this will ruin the detail in post-production.
- Adjust and Refine: Review your histogram on the camera display. The data should be pushed heavily to the right, but you must protect the highlights to maintain detail in the brightest areas of the image.
Advanced Techniques for Mastering High Key Photography
Once you have the basics down, you can elevate your craft by exploring advanced techniques that separate amateurs from seasoned professionals. One such method involves using a seamless paper backdrop and angling the lights slightly downward to create a beautiful gradient of brightness that draws the viewer’s eye directly to the center of the frame. Another pro tip is to use flagging or black cards to subtly shape the light, ensuring you do not inadvertently light areas you want to remain neutral without breaking the high key aesthetic.
For commercial product photography, high key lighting is a secret weapon that makes products look pristine, clean, and luxurious. By using a light tent or a large octabox, you can wrap the product in a smooth, even glow that highlights every intricate detail without distracting from the core subject. This approach is incredibly popular in beauty and skincare advertising, where the emphasis is entirely on the texture and clarity of the product.
Post-Processing: The Secret Sauce of High Key Photos
You cannot achieve a true high key lighting effect solely in-camera; post-processing is where the magic is finalized and the image reaches its full potential. When you import your raw files into Lightroom or Capture One, your goal is to push the exposure further while maintaining a natural, lifelike look that feels intentional rather than artificially blown out. Start by pulling the highlights slider down slightly to recover any blown-out areas on the skin or product edges. Then, increase the shadows and whites to lift the overall tonal range and create that signature luminous feel. The white balance tool is crucial here; sometimes the background can look slightly blue or gray if the lighting is not perfectly neutral. Adjusting the temperature slightly can warm up the image and make it feel more inviting.

The tone curve is your absolute best friend here. By lifting the black point slightly, you eliminate deep shadows entirely, giving the image that signature high key glow. Be cautious of color casts; high key lighting setups can sometimes introduce unwanted warm or cool tints, especially when using colored backdrops or mixed lighting sources. Use the HSL panel to desaturate distracting background colors and ensure skin tones remain natural, glowing, and true to life, preserving the professional aesthetic you worked so hard to capture in-camera.
Frequently Asked Questions About High Key Lighting
What is the difference between high key lighting and overexposed lighting?
Overexposed lighting is accidental and results in a complete loss of detail, turning your image into a solid white blob with no texture. High key lighting, on the other hand, is a deliberate lighting setup where the photographer carefully controls the exposure to maintain texture, detail, and shape while achieving a bright, low-contrast aesthetic that feels intentional and polished.
Can high key lighting be achieved with natural light?
Yes, you can absolutely create a high key photography lighting setup outdoors using the sun combined with a large white reflector or a translucent diffusion panel. Shooting on a bright, overcast day naturally provides the soft, even illumination required for a high key look, eliminating harsh shadows entirely and giving you a beautiful, airy foundation to work with.

What camera settings are best for high key photography?
To achieve the perfect high key lighting setup, use a low ISO (100 or 200) to minimize digital noise, an aperture around f/5.6 to f/8 for optimal sharpness across the frame, and a slightly faster shutter speed to allow you to overexpose the background without blowing out your subject’s important details.
Why is high key lighting used in portrait photography?
High key lighting in photography is frequently used for portraits because it creates a flattering, soft wrap of light around the face. It minimizes skin imperfections and blemishes, conveys a sense of innocence or purity, and produces a clean, professional look that is highly sought after in maternity, newborn, and corporate headshot photography.
Do I need expensive equipment for a high key lighting setup?
Not necessarily. While professional studio strobes are ideal for high-end work, you can start with a single speedlight or a powerful continuous LED light and a white wall or seamless paper backdrop. The most critical element is controlling the light ratios between your subject and background, not the price tag of your gear.
Elevate Your Craft with High Key Lighting
Mastering high key lighting in photography is a rewarding journey that opens up a world of creative possibilities across countless genres. By understanding the nuances of lighting ratios, investing in the right softboxes and reflectors, and refining your post-processing workflow, you can consistently produce images that are bright, joyful, and visually arresting. Whether you are shooting fashion, beauty, or commercial products, the principles of high key lighting remain the same: eliminate harsh shadows, illuminate your background brilliantly, and protect your highlights at all costs. As you practice these techniques, you will find that high key photography is not just about making an image brighter—it is about crafting an atmosphere of optimism, clarity, and professional excellence that leaves a lasting impression on your audience.