Every photographer who has struggled with tricky lighting situations knows the frustration of a poorly exposed shot. Whether you are shooting in a dimly lit studio, working with backlit subjects, or dealing with high-contrast scenes, understanding how your camera measures light can make or break your image. This is where an incident light meter for photography becomes an indispensable tool. Unlike the built-in reflective meters found in every modern camera, an incident light meter reads the light falling on your subject rather than the light bouncing off it. This fundamental difference gives you dramatically more consistent, accurate exposures — especially in situations where your camera’s metering system would be easily fooled.
What Is an Incident Light Meter and How Does It Work?
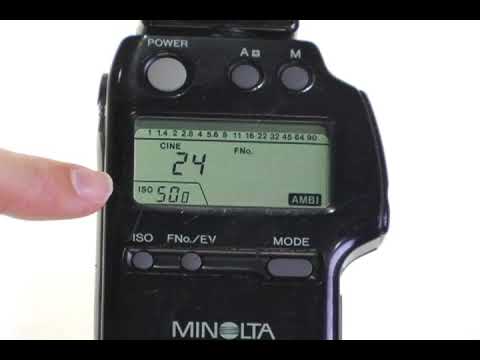
An incident light meter is a handheld exposure measurement device that captures the light falling directly onto your subject. You position the meter right next to your subject, with the white dome — called a lumisphere — facing back toward the camera. The meter then measures the illuminance hitting that point and returns an aperture and shutter speed combination that will produce a properly exposed image based on the ISO you have set.
The science behind this is straightforward but powerful. A reflective meter, like the one inside your DSLR or mirrorless camera, assumes that every scene it sees averages out to middle gray (approximately 18% reflectance). This assumption fails constantly. A snow scene reads too dark. A black cat in a dim room reads too bright. A backlit portrait loses all detail in the shadows because the meter is blinded by the bright background behind your subject.
With incident light metering, none of these problems occur. You are measuring the actual quantity of light illuminating the scene, not the reflectivity of the objects within it. Your subject’s clothing color, skin tone, and background brightness become irrelevant to the measurement. The result is a baseline exposure that you can then adjust creatively to taste.
Incident Metering vs. Reflected Metering: Why the Difference Matters

Understanding the distinction between these two metering philosophies is essential for any photographer looking to take full control of exposure. Here is how they compare:
| Feature | Incident Light Meter | Reflected Light Meter (Camera Built-in) |
| What It Measures | Light falling on the subject | Light reflected from the subject |
| Placement | Next to subject, dome facing camera | Inside the camera, reading through the lens |
| Affected by Subject Reflectivity | No | Yes |
| Best For | Studio work, portraits, high-contrast scenes | General daytime shooting, quick snapshots |
| Accuracy in Backlit Scenes | Excellent | Poor |
| Portability | Requires carrying separate device | Built into camera |
| Cost | $150–$500+ depending on model | Included with camera |
The core advantage of handheld exposure metering becomes obvious in controlled environments. If you are shooting a portrait in a studio with multiple strobes, a reflector, and a window contributing ambient fill, your camera’s reflective meter will struggle to give you a consistent reading. The incident meter ignores all of that complexity and tells you exactly what exposure the light source itself is producing at your subject’s position.
Best Incident Light Meters for Photographers in 2024
The market for dedicated photographic light meters has consolidated around a few trusted brands. When choosing a device, consider your workflow, budget, and the types of shoots you regularly do.
Top Picks for Different Budgets
- Sekonic L-858D-U — Best Overall. This is the gold standard for professional photographers. It handles incident, reflected, and flash metering. Its wide-angle dome captures ambient light beautifully, and its flash metering capability works wirelessly with modern speedlights and strobes. The color histogram display and high-speed sync support make it a favorite among studio and location shooters alike.
- Sekonic L-308X-U — Best Value. A more affordable option that still delivers excellent incident and flash metering. It lacks some of the advanced features of the L-858D but covers the essential needs of portrait and wedding photographers perfectly. Many working professionals still rely on this model daily.
- Gossen Digisix 2 — Best Budget Option. At a fraction of the cost of the Sekonic models, the Digisix 2 provides reliable incident readings for beginners and hobbyists who want to understand light measurement without a significant investment.
Practical Guide: How to Use an Incident Light Meter Like a Pro
Using an incident meter correctly involves a few deliberate steps, and mastering them will transform the consistency of your work.
- Set your ISO. Match the ISO on your light meter to the ISO of the film or digital setting you are using in your camera.
- Hold the meter at your subject’s position. Walk right up to wherever your subject is standing or sitting.
- Point the white dome toward the camera. The dome should face the lens you are shooting with, capturing all light falling on the subject from every direction.
- Take the reading. Press the measurement button and note the aperture and shutter speed combination returned by the meter.
- Set your camera accordingly. Input those values and take your test shot. You will find that your exposures are remarkably accurate from the start.
Expert tip: For portraits, take your incident reading from the shadow side of the subject’s face if you want to preserve shadow detail, or from the highlight side if you are deliberately blowing out the background. You can also take readings at multiple positions and compare the lighting ratios to understand the contrast in your scene before you press the shutter.
Using the Incident Meter for Flash Photography
One of the most powerful applications of a photographic light meter is in flash photography. When you fire a strobe in a studio, your eyes can rarely judge whether the flash power is correct. An incident meter gives you an objective reading every time. Simply trigger your flash while the meter takes its reading, and the device will tell you the precise exposure value. This technique is invaluable for achieving consistent results across multiple frames, which is critical in product photography, catalog work, and portrait sessions.

When Should You Use an Incident Light Meter?
While you do not need an incident meter for every single shot, there are specific scenarios where it dramatically outperforms your camera’s built-in reflective meter:
- Studio portrait sessions with controlled strobes or continuous lighting setups
- High-contrast environments where bright backgrounds would fool reflective metering
- Backlit subjects where the camera would underexpose the foreground
- Film photography, where you cannot afford the cost of wasted frames from incorrect exposures
- Landscape photography at golden hour, when the dynamic range exceeds what your camera’s meter can reliably handle
- Product and commercial photography where lighting precision is non-negotiable
If you find yourself frequently adjusting exposure compensation, bracketing unnecessarily, or second-guessing your histogram, an incident meter will give you the confidence to shoot with certainty from the very first frame.
Common Mistakes to Avoid
Even experienced photographers make errors when working with handheld meters. Here are the most frequent pitfalls:
- Pointing the dome at the light source instead of at the camera. This turns your incident reading into a reflected reading and defeats the purpose entirely.
- Ignoring the ISO setting. A mismatched ISO will produce readings that are consistently off by one or more stops.
- Relying solely on the incident reading without considering creative intent. The meter gives you a technically correct exposure, but you may intentionally want to underexpose for a moody, dramatic look or overexpose for a bright, airy aesthetic.
- Taking readings from too far away from the subject. The closer the meter is to the subject, the more accurate the reading reflects the light falling on that specific area.
Final Thoughts
An incident light meter is not a relic of the film era — it is a precision tool that remains relevant and essential in modern digital photography. The ability to measure light objectively, independent of what your subject reflects, gives you a level of control and consistency that no post-processing workflow can replicate. Whether you are a portrait photographer working in a studio, a film shooter preserving each precious frame, or a landscape photographer chasing the perfect golden-hour exposure, learning to use a handheld meter will elevate your craft to a professional standard. Invest the time to understand your device, practice regularly, and you will notice an immediate improvement in the quality and reliability of your exposures.
Frequently Asked Questions
1. Can I use an incident light meter for video production?
Yes, absolutely. Many videographers rely on handheld incident meters to match exposure across multiple camera setups and lighting rigs. The consistent readings make it easier to maintain uniform exposure when switching between wide shots and close-ups, especially in controlled studio environments where lighting ratios matter as much as they do in still photography.
2. Is a handheld light meter better than a camera’s built-in reflective meter?
Neither is universally “better” — they serve different purposes. Your camera’s reflective meter is fast and convenient for everyday shooting. An incident meter provides superior accuracy in controlled lighting scenarios, backlit conditions, and any situation where subject reflectance would skew the reading. The best photographers often use both in tandem, relying on the incident meter as their baseline and the reflective meter for quick adjustments.
3. How much does a quality incident light meter cost?
Prices range from approximately $100 for budget models like the Gossen Digisix 2 to around $450–$500 for professional-grade units like the Sekonic L-858D-U. The mid-range Sekonic L-308X-U sits around $200 and covers the needs of most working photographers. Consider it a long-term investment that pays for itself in saved reshoots and wasted materials.
4. Does an incident light meter work with LED continuous lighting?
Yes. Incident meters measure whatever light is falling on the subject, regardless of the source type. Whether you are using studio strobes, speedlights, LED panels, or natural window light, the meter will give you an accurate reading of the illuminance at your subject’s position.
5. Do I need an incident meter if I shoot RAW and can fix exposure in post?
While RAW files offer significant latitude for exposure correction, you cannot recover detail that was never captured properly. Blown highlights from incorrect flash exposure or deeply clipped shadows are permanently lost. An incident meter ensures you capture the maximum amount of usable data from the start, reducing your reliance on post-processing and giving you cleaner, more detailed files straight out of the camera.